centos6.5系统中fastdfs 多服务器 多硬盘 多组 配置教程(1/3)
说正文前,先感谢happy_fish100提供的fastdfs,轻量级的分布式文件服务器。
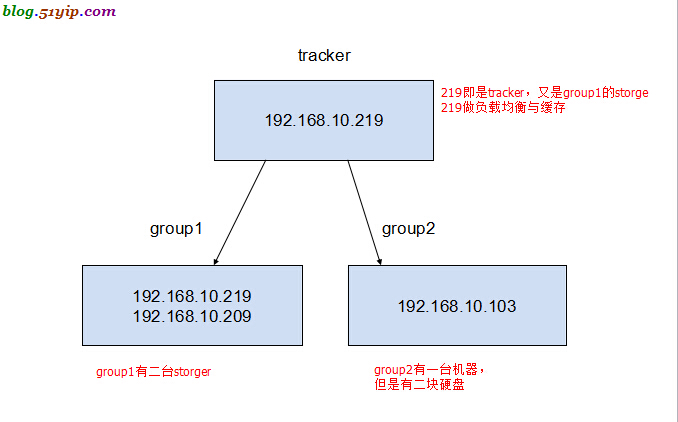
随着用户量的变大,图片,视频等的量会不断的增大,这个时候一个硬盘可能不够用了,就要加硬盘。硬盘加不了时,就要增加服务器了。同一组服务器,文件服务器的东西是一样,不同组的服务器,有不同的文件,不同的组之间,共同组建了文件服务器的所有内容。
下面说一下,安装配置的过程,这里配置的方法,根开发者提供的方法不一样,我没有用到fastdfs-nginx-module,通过配置nginx实现了fastdfs-nginx-module的功能。
一,Fastdfs的下载
地址:http://sourceforge.net/projects/fastdfs/files/FastDFS%20Server%20Source%20Code/
二,服务器,以及系统
我用的centos 6.5 x86_64 ,fastdfs v5.01架构如下:

这里的tracker是单点的,如果出了故障就郁闷了,以前搞过一次多tracker,不过版本比较老了。请参考:fastdfs 多服务器 配置
三,安装fastdfs和nginx
1,安装nginx
| 代码如下 | |
| //安装,gcc,automake,autoconf等依赖包 [root@localhost download]$ yum install gettext gettext-devel libXft libXft-devel libXpm libXpm-devel automake autoconf libXtst-devel gtk+-devel gcc zlib-devel libpng-devel gtk2-devel glib-devel //安装FastDFS [root@localhost download]# tar zxf FastDFS_v5.01.tar.gz [root@localhost download]# cd FastDFS [root@localhost download]# ./make.sh [root@localhost download]# ./make.sh install //安装成功有以下内容 [root@localhost fdfs]# ll /usr/local/bin/ |grep fdfs -rwxr-xr-x 1 root root 522870 7月 4 03:20 fdfs_appender_test -rwxr-xr-x 1 root root 522823 7月 4 03:20 fdfs_appender_test1 -rwxr-xr-x 1 root root 513975 7月 4 03:20 fdfs_append_file -rwxr-xr-x 1 root root 513393 7月 4 03:20 fdfs_crc32 -rwxr-xr-x 1 root root 513927 7月 4 03:20 fdfs_delete_file -rwxr-xr-x 1 root root 514329 7月 4 03:20 fdfs_download_file -rwxr-xr-x 1 root root 514093 7月 4 03:20 fdfs_file_info -rwxr-xr-x 1 root root 525024 7月 4 03:20 fdfs_monitor -rwxr-xr-x 1 root root 1179642 7月 4 03:20 fdfs_storaged -rwxr-xr-x 1 root root 529805 7月 4 03:20 fdfs_test -rwxr-xr-x 1 root root 527726 7月 4 03:20 fdfs_test1 -rwxr-xr-x 1 root root 655761 7月 4 03:20 fdfs_trackerd -rwxr-xr-x 1 root root 514173 7月 4 03:20 fdfs_upload_appender -rwxr-xr-x 1 root root 514951 7月 4 03:20 fdfs_upload_file |
|
2,安装nginx
| 代码如下 | |
| [root@localhost fdfs]# yum install nginx |
|
所有机器的fastdfs和nginx安装方法都是一样。
四,配置192.168.10.219服务器
1,配置tracker和storage
| 代码如下 | |
| [root@localhost fdfs]# vim /etc/fdfs/tracker.conf port=22122 #设置tracker的端口号 base_path=/var/www/fastdfs #设置tracker的数据文件和日志目录(需预先创建) |
|
如果要调优,
| 代码如下 | |
| [root@localhost fdfs]# vim /etc/fdfs/storage.conf group_name=group1 #组名,根据实际情况修改 port=23000 #设置storage的端口号 base_path=/var/www/fastdfs #设置storage的日志目录(需预先创建) store_path_count=1 #存储路径个数,需要和store_path个数匹配 store_path0=/var/www/fastdfs #存储路径 tracker_server=192.168.10.219:22122 #tracker服务器的IP地址和端口号 |
|


