Centos6.3下单系统多mysql实例配置
发布时间:01/15 来源: 浏览:
关键词:
最近因为单位项目扩充,需要在原线上数据库服务器上加装一个mysql实例(实际上就是从新编译安装一个非3306的自定义端口,不同目录的mysql),研究了一天,终于顺利搞定,这里把配置步骤发给大家,供大家学习使用.
注:本文档做了两个MYSQL实例,多个实例方法以此类推
LINUX操作系统:centOS6.3 64bit(安装了系统默认开发包)
实例一:
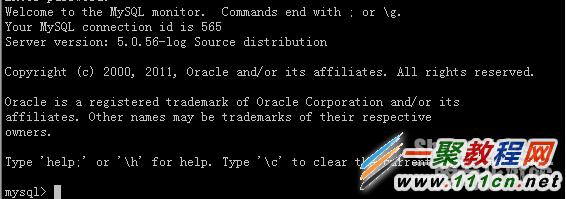
MYSQL版本:mysql-5.0.56
PORT:3306
系统目录:/usr/local/mysql3306
实例二:
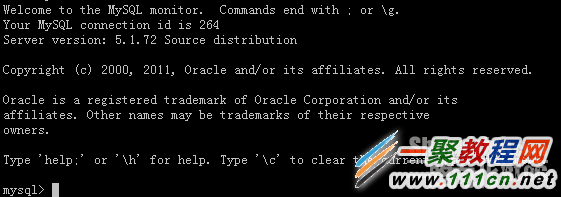
MYSQL版本:mysql-5.1.72
PORT:3307
系统目录:/usr/local/mysql3307
一.安装开发包(使用默认CENTOS更新源):
# yum -y install wget gcc-c++ ncurses ncurses-devel cmake make perl bison openssl openssl-devel gcc* libxml2 libxml2-devel curl-devel libjpeg* libpng* freetype*
二.关闭iptables和SELINUX
# service iptables stop
# setenforce 0
# vi /etc/sysconfig/selinux
---------------
SELINUX=disabled
---------------
三.安装mysql数据库实例
1.下载编译包:
# su -
# mkdir ~/src
# cd src
# wget http://mysql.cdpa.nsysu.edu.tw/Downloads/MySQL-5.1/mysql-5.1.73.tar.gz
# wget http://down1.chinaunix.net/distfiles/mysql-5.0.56.tar.gz
2.安装前的初始配置工作:
1).创建一个Mysql用户
# useradd mysql
2).新建mysql下data和log子目录
# mkdir /usr/local/mysql{3306,3307}/data
# mkdir /usr/local/mysql{3306,3307}/log
3).修改目录的所属者以及所属组权限
# chown -R mysql:mysql /usr/local/mysql{3306,3307}/data/
# chown -R mysql:mysql /usr/local/mysql{3306,3307}/log/
# chmod 750 /usr/local/mysql{3306,3307}/data
# chmod 750 /usr/local/mysql{3306,3307}/log
4).创建mysql相关目录并配置权限
# mkdir -p /usr/local/mysql{3306,3307}/etc
# chown -R mysql.mysql /usr/local/mysql{3306,3307}/etc
# mkdir -p /var/run/mysqld{3306,3307}
# chown -R mysql.mysql /var/run/mysqld{3306,3307}
# mkdir -p /var/lib/mysqld{3306,3307}
# chown -R mysql.mysql /var/lib/mysqld{3306,3307}
# cp /etc/my.cnf /usr/local/mysql{3306,3307}/etc
3.解包编译安装
编译实例一:
# cd ~/src
# tar -zxvf mysql-5.0.56.tar.gz
# cd mysql-5.0.56
./configure --prefix=/usr/local/mysql3306 --with-mysqld-user=mysql --sysconfdir=/usr/local/mysql3306/etc --localstatedir=/usr/local/mysql3306/data --with-tcp-port=3306 -enable-assembler --with-mysqld-ldflags=-all-static --with-charset=utf8 --with-extra-charsets=gbk -with-extra-charsets=all --with-plugins=csv,innobase,myisam,heap --with-unix-socket-path=/tmp/mysql3306.sock
# make
# make install
编译实例二:
# cd ~/src
# tar -zxvf mysql-5.1.71.tar.gz
# cd mysql-5.1.71
./configure --prefix=/usr/local/mysql3307 --with-mysqld-user=mysql --sysconfdir=/usr/local/mysql3307/etc --localstatedir=/usr/local/mysql3307/data --with-tcp-port=3307 -enable-assembler --with-mysqld-ldflags=-all-static --with-charset=utf8 --with-extra-charsets=gbk -with-extra-charsets=all --with-plugins=csv,innobase,myisam,heap --with-unix-socket-path=/tmp/mysql3307.sock
# make
# make install
4.编写mysql配置项:
实例一:
# vi /usr/local/mysql3306/etc/my.cnf
-------------------------------------------------------
[mysqld]
datadir=/usr/local/mysql3306/data
socket=/tmp/mysql3306.sock
user=mysql
port=3306
pid-file=/var/lib/mysqld3306/mysql.pid
# Disabling symbolic-links is recommended to prevent assorted security risks
symbolic-links=0
max_connections= 16384
skip-name-resolve
skip-locking
key_buffer = 256M
max_allowed_packet = 32M
table_cache = 3072
thread_cache_size = 256
sort_buffer_size = 16M
read_buffer_size = 4M
read_rnd_buffer_size = 16M
net_buffer_length = 256M
thread_stack = 8M
query_cache_size = 128M
query_cache_limit = 2M
wait_timeout=7200
interactive_timeout=7200
#log
log-error=/usr/local/mysql3306/log/error.log
log=/usr/local/mysql3306/log/mysql.log
long_query_time=2
log-slow-queries= /usr/local/mysql3306/log/slowquery.log
log-bin= /usr/local/mysql3306/log/bin.log
expire_logs_days = 15
sync_binlog = 1
max_binlog_cache_size = 4294967295
local-infile=0
[mysqld_safe]
log-error=/var/log/mysqld3306.log
pid-file=/var/run/mysqld3306/mysqld.pid
-------------------------------------------------------
实例二: www.111cn.nEt
# vi /usr/local/mysql3307/etc/my.cnf
-------------------------------------------------------
[mysqld]
datadir=/usr/local/mysql3307/data
socket=/tmp/mysql3307.sock
user=mysql
port=3307
pid-file=/var/lib/mysqld3307/mysql.pid
# Disabling symbolic-links is recommended to prevent assorted security risks
symbolic-links=0
max_connections= 16384
skip-name-resolve
skip-locking
key_buffer = 256M
max_allowed_packet = 32M
table_cache = 3072
thread_cache_size = 256
sort_buffer_size = 16M
read_buffer_size = 4M
read_rnd_buffer_size = 16M
net_buffer_length = 256M
thread_stack = 8M
query_cache_size = 128M
query_cache_limit = 2M
wait_timeout=7200
interactive_timeout=7200
#log
log-error=/usr/local/mysql3307/log/error.log
log=/usr/local/mysql3307/log/mysql.log
long_query_time=2
log-slow-queries= /usr/local/mysql3307/log/slowquery.log
log-bin= /usr/local/mysql3307/log/bin.log
expire_logs_days = 15
sync_binlog = 1
max_binlog_cache_size = 4294967295
local-infile=0
[mysqld_safe]
log-error=/var/log/mysqld3307.log
pid-file=/var/run/mysqld3307/mysqld.pid
-------------------------------------------------------
5.将mysql的库文件路径加入系统的库文件搜索路径中
方法一:直接做软链接
# ln -s /usr/local/mysql3306/lib/mysql /usr/lib/mysql
方法二:利用ldconfig导入系统库
# echo "/usr/local/mysql3306/lib" >> /etc/ld.so.conf.d/mysql.conf
# ldconfig
6.输出mysql的头文件到系统头文件
# ln -s /usr/local/mysql3306/include/mysql /usr/include/mysql
注: 此处只需将一个mysql实例的库文件添加到系统库,无需多次添加
7.进入相应实例的安装路径,初始化各自配置脚本
实例一:
# cd /usr/local/mysql3306
# scripts/mysql_install_db --user=mysql --datadir=/usr/local/mysql3306/data
实例二:
# cd /usr/local/mysql3307
# scripts/mysql_install_db --user=mysql --datadir=/usr/local/mysql3307/data
8.复制mysql启动脚本到系统服务目录,并更改脚本配置
# cp /usr/local/mysql/support-files/mysql.server /etc/init.d/mysqld3306
# cp /usr/local/mysql/support-files/mysql.server /etc/init.d/mysqld3307
实例一:
# vi /etc/init.d/mysqld3006
搜索如下行,红色标注的为添加的参数:
---------------------------------------------
basedir=/usr/local/mysql3306
datadir=/usr/local/mysql3306/data
conf=/usr/local/mysql3306/etc/my.cnf
$bindir/mysqld_safe --defaults-file=$conf --datadir=$datadir --pid-file=$server_pid_file $other_args >/dev/null 2>&1 &
--------------------------------------------
实例二:
# vi /etc/init.d/mysqld3007
搜索如下行,红色标注的为添加的参数:
---------------------------------------------
basedir=/usr/local/mysql3307
datadir=/usr/local/mysql3307/data
conf=/usr/local/mysql3307/etc/my.cnf
$bindir/mysqld_safe --defaults-file=$conf --datadir=$datadir --pid-file=$server_pid_file $other_args >/dev/null 2>&1 &
--------------------------------------------
9.系统启动项相关配置
实例一:
# chkconfig --add mysqld3306 #添加开机启动服务
# chkconfig --level 35 mysqld3306 on #设置mysql启动
实例二:
# chkconfig --add mysqld3307
# chkconfig --level 35 mysqld3307 on
10.启动mysql
实例一:
# service mysqld3306 start
实例二: www.111cn.net
# service mysqld3307 start
11 添加mysql命令集到系统全局变量
注:如果系统之前未安装mysql客户端,可以将编译好的mysql命令集导入系统全局变量
以后就可以直接使用mysql命令集,而不需要使用绝对路径访问.
# echo "PATH=$PATH:/usr/local/mysql3306/bin;export PATH" >> /etc/profile
# source /etc/profile
12. 设置初始账户,并登陆后台:
实例一:
# /usr/local/mysql3306/bin/mysqladmin -u root password 123456 #设置超级管理员密码
# /usr/local/mysql3306/bin/mysql -P3306 -S/tmp/mysql3306.sock -uroot -p123456 #连接数据库
实例二:
# /usr/local/mysql3307/bin/mysqladmin -u root password 123456 #设置超级管理员密码
# /usr/local/mysql3307/bin/mysql -P3307 -S/tmp/mysql3307.sock -uroot -p123456 #连接数据库
注: 因为加了mysql环境变量,以后系统后台可以直接使用mysql命令登录,这里使用绝对路径是为了规范操作
# mysql -P3307 -S/tmp/mysql3307.sock -uroot -p123456
13.端口测试:
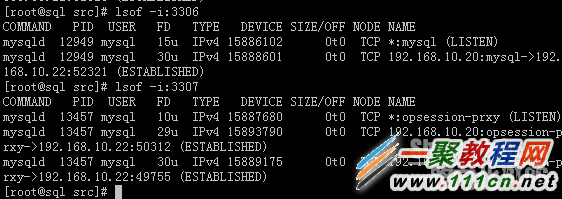
大功告成.....O(∩_∩)O~


